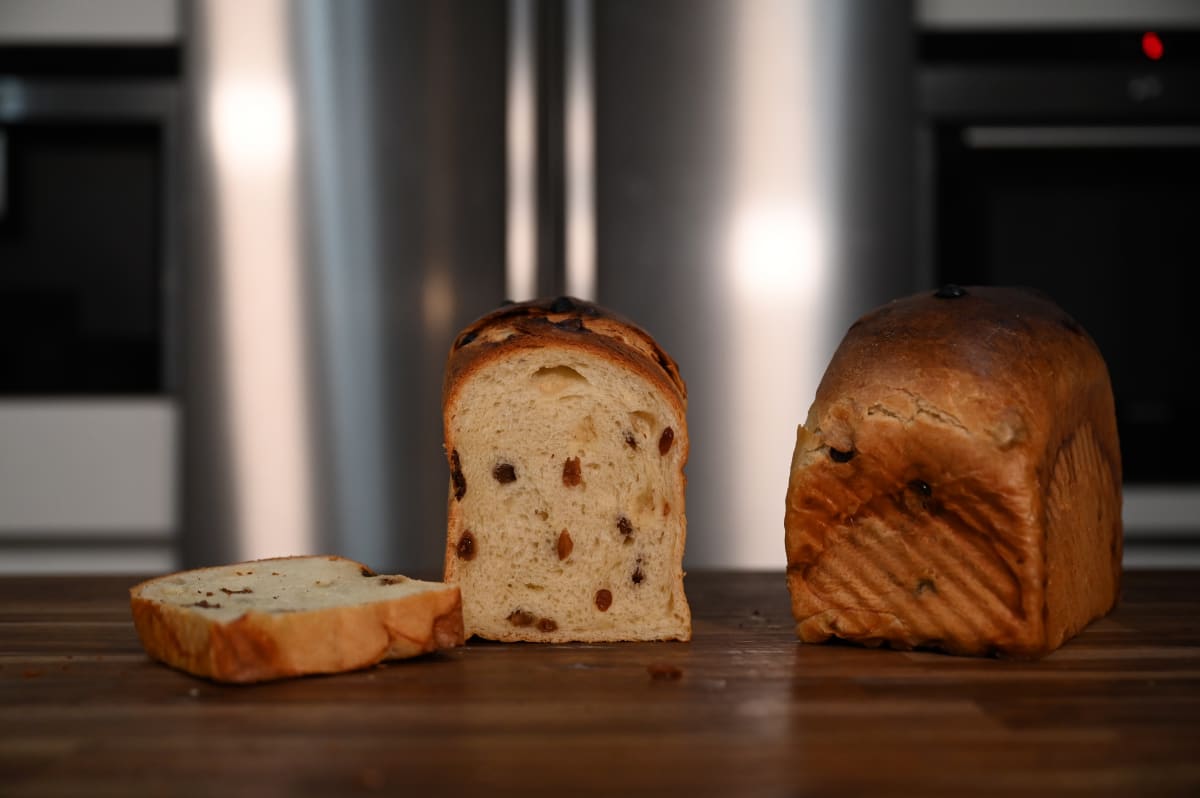
Sourdough Raisin Brioche
By From Luxembourg With Loaf · Last edited May 2, 2026
Sourdough Raisin Brioche
By From Luxembourg With Loaf · Last edited May 2, 2026
Most of my baking problems are caused by impatience. I come up with a recipe and realize the fermentation isn't working. I bake the bread anyway and am always disappointed. I was no different with this great recipe, so this time I thought you should learn something here too. Namely to be spontaneous. So I put the bread in the brioche for 24 hours and the result is sooo delicious. You will love this raisin brioche! It keeps fresh for at least 5 days and is simply delicious.
- Total weight
- 1,920g
- Yield
- 2units
- Unit weight
- 960g
- Hydration
- 40%
Ingredients
Stiff Starter
160gSoaker
250gMain Dough
1,670gProcess
Levain Preparation
Mix the flour, water, and seed starter the evening before. Let it ferment at room temperature until matured.
Soaking
Thirty minutes before starting the main dough, soak the raisins in the orange juice to rehydrate.
Initial Mixing
In a stand mixer, combine the flour, milk, stiff starter, sugar, and eggs. Mix on low speed for 10 minutes until the gluten begins to develop.
Butter Incorporation
Increase the mixer speed. Add the butter in three equal portions, allowing 2 minutes of mixing between each addition to ensure full emulsification.
Final Inclusion Mixing
Add the salt and the soaked raisins. Mix on high speed for an additional 2 minutes.
Development Check
Perform a windowpane test to ensure sufficient gluten strength. Transfer the dough to a countertop, form into a smooth round, and place into a greased container.
Bulk Fermentation & Folding
Let the dough rise for 2–4 hours total. During the first 2 hours, perform a coil fold every 30 minutes (4 folds total).
Division and Bench Rest
Divide the dough into desired portions. Leave the pieces uncovered on the countertop to rest for 30 minutes.
Shaping and Final Proof
Shape the dough pieces and place them into greased loaf pans. Let rise for approximately 2 hours until doubled in volume. Note: if the activity is slow, the pans can be cold-proofed in the fridge for 12 hours.
Finishing
Once baked, remove the loaves from the oven and immediately brush the crust with hot butter. Allow to cool completely before slicing.
Initial Bake
Final Bake (Standard)
Final Bake (After Cold Proof)
Community
Log in to share your thoughts or bakes.
Log in to participate